The
2994cc Ford Essex V6 was fitted to TVR's 3000M & Turbo, Taimar & Taimar
Turbo, to Ford's Capri 3.0, Granada 3.0, Transit, Ambulance, to Holden's V6
in Australia, to Reliant's Scimitar GTE, and more.
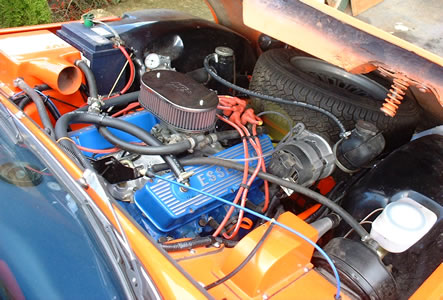
Contrary to many other engines from its era, the Ford 3 Litre Essex V6 is
a very reliable engine. As always, this depends on it's treatment, and there
are a few points to note when servicing:
Oil & Oil filter - always change both at 6000 miles or sooner -
the Essex has no proper magnetic particle "trap", making the engine
more likely to suffer from missed oil changes. Always change the sump plug
washer (making sure the correct type is used).
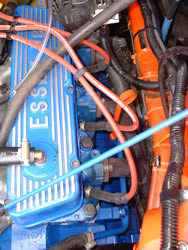
Rocker Covers - Check for tightness - leaks here will fill your TVR
with more fumes than usual - the standard covers are prone to warping due
to overtightening the screws, and may require removal and careful flattening
with a suitable hammer/worksurface. See modification section for replacing
with alloy type covers.
Rocker arms - check for excess valve clearance - the standard items
are far from precise and have a tendency to wear. Roller rockers are far better
and setting them up properly saves many minutes every service (more to follow
- see elsewhere in this section to appear soon). Did you know that worn rocker
arms cause the valve lift ratio to become uneven?
Rocker Cover Gaskets - Always replace if covers have been removed.
Ignition Coil - Check it is tight if fitted to the nearside rear of
the engine block - it can work loose due to the engine vibration.
Coolant - check header tank (tall coolant cylinder at n/s front of
engine) is fully topped up. Make sure that engine is fully cold though to
avoid the risk of being scorched!
Carburettor - Remove air filter and ensure screws fixing airbox to
carb are tight - these can work loose and could bounce into inlet. If they
are loose but won't tighten, you will need to replace with a suitable fixing.
Spark Plugs - Inspect carefully for problems - this could be the only
sign of engine trouble (see section on spark plugs appearing soon).
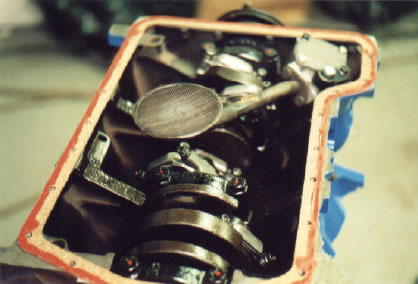
Sump/Sump Gasket - This is another weak area - oil leaks are all too
common. The gasket can be changed with the engine in situ., but a lot of patience
is required. Gasket sealant is useful here to keep the gasket in place, but
make sure you use the "Red" type sealant that dries into a hard'ish
putty. This will ooze from the joint when tightened and could fall into the
sump, blocking the oil strainer. The "Blue" type sealant tends to
have better adhesion to keep it stuck to itself (so as to not fall into sump),
but is more sticky & harder to clean off. Always change the sump plug
washer (making sure the correct type is used). Always change the sump plug
washer (making sure the correct type is used). See below for best way to apply
sealant to ensure a leak free sump (in the case of the sump being fitted when
the engine is out you can use the red sealant as you know sump will not slide
around as it does when you're stuck under the car!
Distributor & Cap - Remove cap & inspect usual stuff like points
& condensor, rotor arm 7 cap. replace any if faulty/worn. Next check vacuum
advance (if standard distributor fitted) by removing vacuum pipe from carburettor
and applying suction. Points mounting plate should move freely. If it doesn't,
manually try to rotate mounting plate. If this moves, and when you sucked
on the pipe air kept coming, then a new vacuum capsule is required. With this
part not working, acceleration and fuel consumption will suffer.
Alternator - Check drivebelt and adjust as necessary, and check alternator
for bearing slack by holding pulley with both hands from the direction of
the front of the car, and rocking pulley side to side. Any play will mean
a replacement alternator or re-bushing is required depending on the facilities
you have.
Water pump - Do the same as the Alternator - to check if the bearings
are worn out. Also inspect underneath pump for signs of water leaks - there
is a vent hole which allows water to exit if seal wears out (this is normally
the first sign of the pump seal failing).
Exhaust - Check the exhaust nuts and/or bolts fixing the manifold to
the cylinder heads are tight. Also check for soot around the joint which means
a new gasket is required. These manifolds are extremely awkward to remove
if standard studs are fitted to the cylinder heads. If at all possible, fit
bolts to as many of the head fixings as you can so gaskets can be slid into
place rather than removing manifold to allow fitment.
More to follow soon.....
Painting
the block
When
you get your engine stripped down this far, that is the time you should spend
an extra few hours cleaning, scraping and degreasing the block to ensure its
new coat of engine lacquer has a good oil free base to stick to....
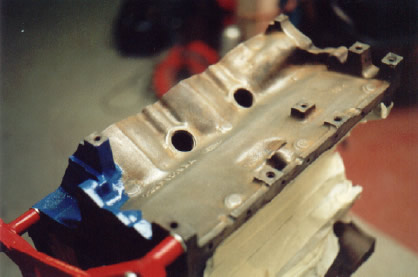
And
the finished article....
3
Litre Essex V6 - Modifications
This section will contain many articles regarding performance mod's and tweaks available to your M Series.
Fitting a Roller Rocker Kit - all you need to know to fit, problems you may encounter and suggested ways round them, with useful photo's of the finished product. Article now published (20th June 2002).
Steel Drive Gear replacement for the stock nylon toothed item - a weak point for all modified 3.0L Essex engines. See further below for introduction on this item.
Fitting a performance camshaft, and timing the cam, fitting new cam followers, startup procedure.
Fitting alloy rocker covers
Balancing the bottom end
Lightening the connecting rods & balancing
High performance oil pumps - fitting
Cylinder head modifications - see below for first snippets of information
Plus much much more to follow.
Steel
Cam Gear
Fitting
this part is not going to make your engine any lighter or quieter, in fact
it creates a lot more noise than the stock nylon tooth type gear. What it
does provide though is insurance that the engine won't self destruct under
high stresses when running anything more than a mildly tuned setup.
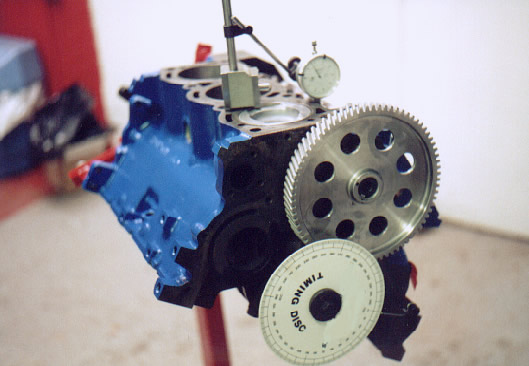
Here you can see the engine's cam being "timed". Traditionally, a protractor is used to set the cam to the correct position. The cam manufacturer will recommend a certain number of degrees it needs to be set at - so a special 360º protractor, a wire pointer, and a dti gauge are required, along with a set of offset woodruff keys to allow the adjustment. A vernier type gear is not available (as far as I know), in the 3000M & Taimar it's not an engine out job to check the cam timing, and a performace increase isn't out of the question if the standard flat woodruff key has been used. The aim is to get the crankshaft set on TDC position at exactly the same time as the valve lift is maximised on each pair of rocking valves.
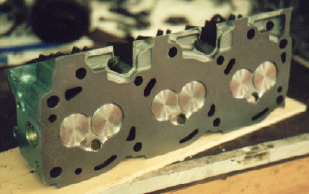
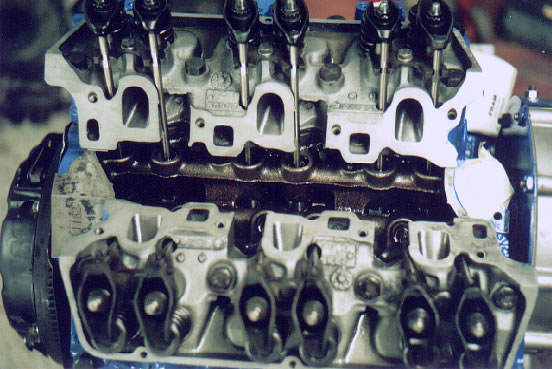
Cylinder
Heads
The
cylinder heads for the V6 Essex are of a fairly simple cast iron design. Shown
below is a "Stage 3" head on it's return from the engineers....
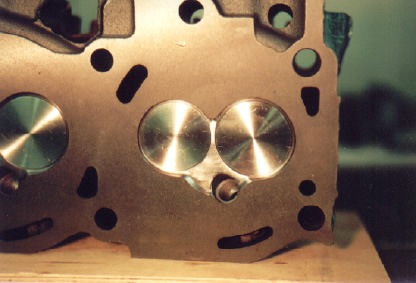
And this is
what the valve area looks like....
You cannot skim too much off the head as it can cause clearance problems -
especially with the higher lift cams available these days. When getting your
head skimmed be sure you get the other one done to the same compression ratio!
Heads that have been skimmed before may be ready for the scrap-heap if too
much has already been removed.
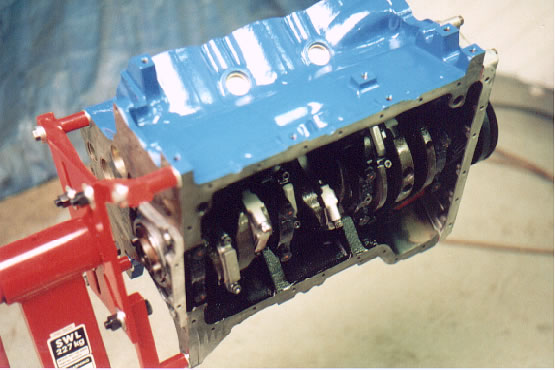
Top
view of the Essex V6, without the inlet manifold....
The main point to note here is that when building your V6, make sure you don't leave any nuts or bolts resting in this area! Pushrods are rather basic in the way that the guides keep them from rubbing on the cylinder heads. I've seen one of these guides wear very slightly, but enough to allow pushrod to "polish" a bit of the head. Under higher loads this could cause trouble. The rocker arms are really basic (standard ones shown above). There is now full information on fitting the roller type rockers - see separate page.